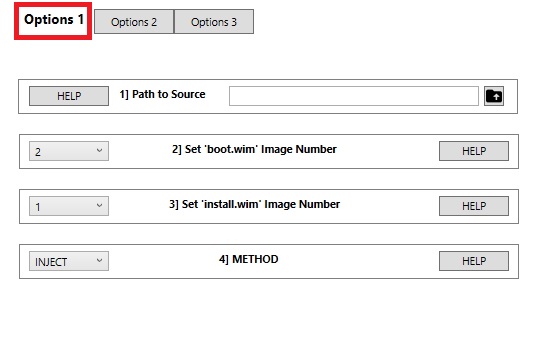
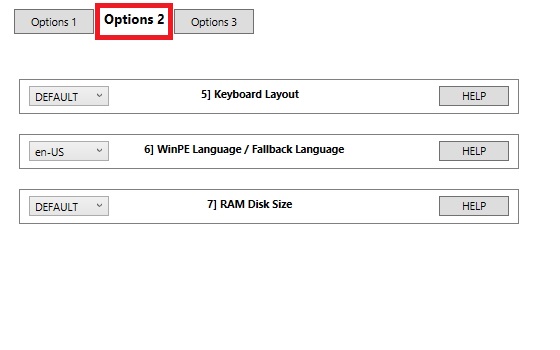
A number of configurable options are contained in the main project file. The screenshots below display these options (clicking on the HELP button from within the project displays information about what the individual options do) -
Core Scripts
Please note that only two of the scripts in this section are actually visible to the end user in the PEBakery User Interface - the remainder are hidden from view in an effort to declutter the interface.
Core Files - This script cannot be disabled. Most of the work is carried out in this script, including error checks, file checks, verifying source language/build/processor architecture, and copying and extracting the required files from the selected source. Path - Projects > ChrisPE > Core > A_core.script
Browse for Folder - used to add Browse for Folder dialog support. This script is hidden and is executed by other scripts to ensure that Browse for Folder support is added as required for individual applications. Path - Projects > ChrisPE > Core > Browse.For.Folder.script
Common Commands - this script is hidden and is executed by other scripts as required. Supported commands include directory delete (following an error) and creating startmenu shortcuts. Path - Projects > ChrisPE > Core > common.script
SysWOW64 - this script is hidden. It contains registry settings required for WoW64 support. Path - Projects > ChrisPE > Core > syswow64.script
Verification Checks - this script is hidden and is executed by other program scripts for a range of checks including identification of source files. Path - Projects > ChrisPE > Core > verify.script
Shell Scripts
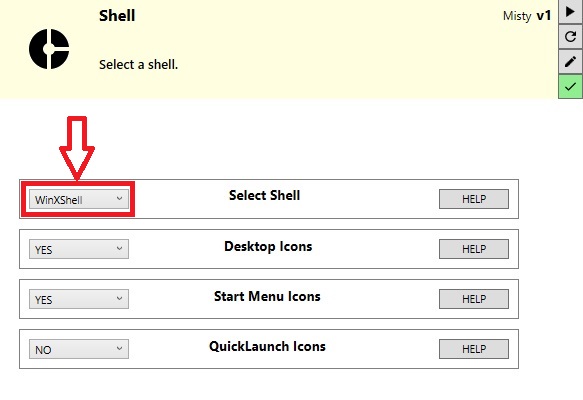
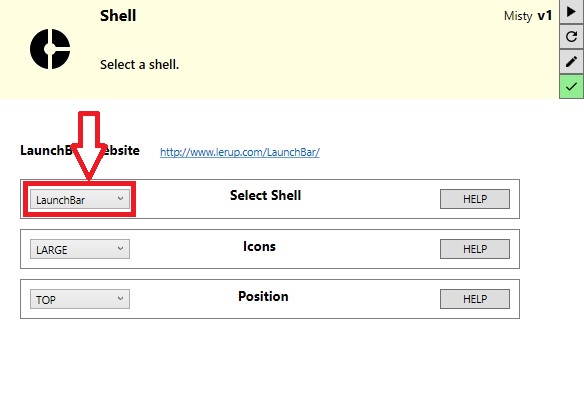
Shell - select a shell. Current options are WinXShell, bblean, CMD and LaunchBar. The shell script is context sensitive and different options will be visible depending on the selected shell. Click on the HELP buttons for information about the available options.
Path - Projects > ChrisPE > Shell > B_shell.script
WinXShell shell options -
LaunchBar shell options -
Default Filemanager - set the default FileExplorer. Either 7-zip, Explorer++, Q-Dir or 7-zip can be selected. Path - Projects > ChrisPE > Shell > B_shell.script
Settings Scripts
Network - this script can be enabled without selecting any of the script options to give different results -
No options selected - will add a batch file + a menu entry to run it. The batch file runs the command "wpeutil InitializeNetwork" - this will Initialize network components and drivers, and set the computer name to a randomly chosen value. Running the InitializeNetwork command can cause an unnecessary delay when WinPE boots - added it as a menu option ensures that the network can be started if required.
Option(s) selected - selecting any combination of script options will add unattend.xml to the build, with a menu entry added to winpeshl.ini to automatically run wpeinit. This will Initialize the network during the boot process. This is useful if an application requires network access - e.g. TightVNC Server.
BootSect - tool used to add NTLDR or BOOTMGR code to a Volume Boot Record. This script adds a batch file to the build as the required program is already included. The batch can be executed by right-clicking on a drive in Explorer.
CMD Here - Start a command prompt from the right-click context menu.
Keyboard Layout - change the keyboard layout in WinPE whilst it's running. Uses wpeutil tool that is already included in the build.
ScreenRes - This will add a menu option for changing the screen resolution. No external programs are used, however a number of xml files are added - this option simply starts a batch file that will run the wpeinit command to change the screen resolution to a value set in the included xml files. A number of screen resolutions are available in the batch file.
Tweaks - includes a range of tweaks. Click on the ? buttons for information about the available options.
Path - Projects > ChrisPE > Settings > Tweaks.script
Wallpaper - select a custom wallpaper. A project wallpaper can be used. Not working if LaunchBar or CMD are selected as shell. Path - Projects > ChrisPE > Settings > wallpaper.script
Applications Scripts
The following lists all of the program/application scripts that are included in the ChrisPE project download.
LaunchBar - a program launcher created by Peter Lerup. "...LaunchBar is a small Windows freeware program that mimics the behavior of the dockable QuickLaunch toolbar that was available in all Windows versions before Windows 7...". Please refer to the LaunchBar website (see here) for more information.
If LaunchBar is enabled, an option to add shortcuts to the LaunchBar menu can be selected in application scripts. Screenshot of LaunchBar running -
Included in download - YES
Processor Architecture - x86 and x64
Add Custom Folders\Files - select a directory and it's contents will be added to the build.
Included in download - N/A
Processor Architecture - N/A
7-Zip (version 16.04) - File archiver. Used to extract contents from .zip/.7z/.iso/.wim files and numerous other file types. Can also create .zip and .7z files. Right click a file in explorer to access menu options for extracting from or creating files. 7-zip website
Included in download - YES
Processor Architecture - x86 and x64
Disk Management - Disk management console (diskmgmt.msc). Not working in WinPE 2.* (Vista sources). This will add an option to install diskmgmt.msc on demand. Credit to IcemanND on the msfn forum - see here.
Included in download - N/A
Processor Architecture - x86 and x64
DMDE (Version 3.4.2) - "...is a powerful software for data searching, editing, and recovery on disks. It may recover directory structure and files in some complicated cases through the use of special algorithms when other software can't help....DMDE has a number of freeware features such as disk editor, simple partition manager (e.g. allows undelete a partition), a tool to create disk images and clones, RAID constructor, file recovery from the current panel....DMDE supports FAT12/16, FAT32, NTFS, Ext2/3/4..." The Free Edition is included in the download - please refer to the License Agreement - here. DMDE website
Included in download - YES
Processor Architecture - x86 only
Explorer++ (version 1.3.5) - file manager with multiple pane and tab support. Explorer++ website
Included in download - YES
Processor Architecture - x86 and x64
ImDisk (version 2.0.9) - ImDisk is a virtual disk driver for Windows. It can create virtual hard disk, floppy or CD/DVD drives using image files or system memory. Right click on supported image types (e.g. .iso files) to mount them as virtual drives. Can also be used to create disc images of real drives. ImDisk website
Included in download - YES
Processor Architecture - x86 and x64
JustManager (Version 0.1 Alpha 54) - file manager with multiple pane and tab support. JustManager website
Included in download - YES
Processor Architecture - x86 and x64
Q-Dir - Quad explorer file manager with multiple pane and tab support. Q-Dir website
TightVNC Server (Version 2.8.8.0) - VNC server application. Boot WinPE and create a Remote Desktop - accessing the WinPE system from a VNC client application. Includes an option to run at boot - this is useful if booting WinPE on a remote/headless system. TightVNC website
Included in download - YES
Processor Architecture - x86 and x64
TinyHexer (version 1.7) - Tiny hexer is a hex editor for binary files. It will also allow access and editing of disk sectors.
Included in download - YES
Processor Architecture - x86 only
Finalise
Subst - add a batch file to locate the boot media (via a unique tag file created during the boot process) and use the subst.exe utility to assign a virtual drive letter. This is useful if using custom scripts/utilities/shortcuts with a hardcoded path.
Path - Projects > ChrisPE > Finalise > Subst.script
WinFE - Add the registry settings required to create a Windows Forensic Environment. Erwan Labalec's DiskMgr will be added to the build - this provides a User Interface for toggling disk attributes.
Path - Projects > ChrisPE > Finalise > winfe.script
Shell - Finalise - This script cannot be disabled. Menu entries are configured via this script , winpeshl.ini is created, and files are injected to boot.wim. Path - Projects > ChrisPE > Finalise > xxxShell.script
Drivers
Only one script is included in this section -
Drivers - Use this script to integrate drivers to the build. Get WAIK Tools is used to download DISM. There are two options in the script -
EXTRACT - the contents of the image selected in boot.wim will be fully extracted and DISM will be used to inject the drivers to the offline image. If this method is selected then setting option 4 in the main project script (METHOD) as EXTRACT is recommended - this will fully extract boot.wim early in the build process.
MOUNT - DISM will be used to mount the image selected in boot.wim
> inject drivers to the mounted image > unmount the image.
The script in this section can either be selected during the build process, or can be executed independently afterwards - as long as the build completed successfully. Files in the %BaseDir%\ChrisPE.Files\ISO.ROOT\ directory (where %BaseDir% refers to the directory from which PEBakeryLauncher.exe is running) are added to the .iso file.
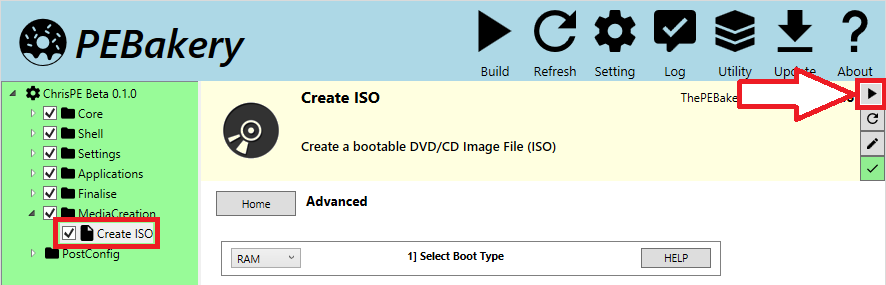
Create ISO - this script includes a number of options, the default settings will create a RAM bootable ISO file using MKISOFS - for use on BIOS and UEFI based systems. It's also possible to create a Flat Boot WinPE (WinPE 2.x/3.x only) or even a multiboot ISO file with options for RAM Boot and Flat Boot - bootable on UEFI and BIOS based systems.
To execute the Create ISO script following a build, simply select the script in the directory tree and click on the Run Script button to the right of the title bar -
PostConfig
The scripts in this section cannot be executed during the build process and is designed for post processing.
Advanced Options - Can be used to mount/unmount the registry hives created when the ChrisPE project has finished the build process. This script can also be used to inject (add) additional files to boot.wim and carry out some additional tasks.
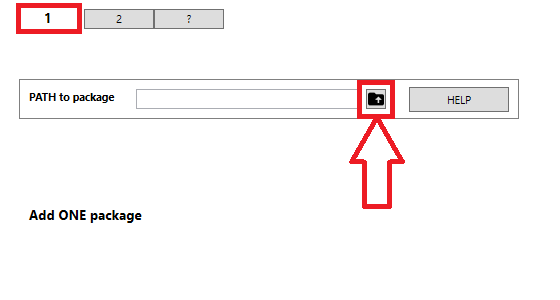
Add Package - Use this script to add a ChrisPE compatible Package to the project (refer to the Packages section for more information) -